Cleaning Your Dutch Oven
As they say, "Cleanliness is next to Godliness"
This is a good saying to keep in mind when caring for your dutch oven. Keeping your dutch oven clean will make heavenly meals possible while a dirty oven will be hellish. Cleaning a dutch oven is actually easier than other pots and pans, once it has been seasoned well. So, be sure to season your dutch oven before you use it and periodically as needed.
If you choose to not season your aluminum dutch oven, then the cleaning of it is just like ordinary aluminum campware. Use soap and water and scrub until it's clean. But, as I mentioned on other pages, a seasoned aluminum dutch oven makes better meals so I'll assume you decided to season yours or you have cast iron that is well seasoned.
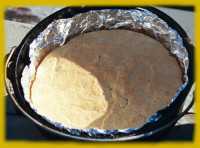
 A trick to make clean-up easier is to line your dutch oven with aluminum foil and then put your food in that inner shell. Another trick is to set an aluminum pie tin on 4 or 5 small pebbles in the bottom of the pot and then cook in the pie tin. Both of these methods are useful for keeping the dutch oven clean and they work well, especially for baking breads, cakes, and rolls. But, I feel that you lose a lot of the fun of dutch oven cooking when you do it that way for regular food that is meant to be cooked in the pot. So, keep those in mind, especially if you're just starting, as ways to minimize clean-up.
Cleaning is a two-step process. You first remove all food bits and then maintain the seasoned coating.
Step #1 - to remove food, make sure everyone has scooped out the last edible parts. Then, ...
- While the dutch oven is not too hot, pour a few inches of clean water into the oven.
- Put the lid on and heat it - you could do this while you're enjoying the meal.
- Remove it from the heat and let it cool a few minutes.
- When it's cool enough to work with, use a plastic food scraper or sponge to scrape off the last bits of food that should be pretty soft and loose now.
- Discard the dirty water and rinse the pot with clean water.
- Check that you've gotten all the food off and repeat if needed.
Step #2 - to maintain the seasoned coating,
- Thoroughly dry the dutch oven. Hang it over or set it by the fire with the lid slightly askew. The heat of the fire will heat up the metal, driving out any moisture and having the lid open a bit will let that moisture escape. This should only be about 5 minutes.
- When the dutch oven is cool enough to work with, use a paper towel to rub a small amount of unflavored vegetable oil all over the inside and outside.
- Use a clean paper towel to wipe off all excess oil so there is just a thin film of protection from moisture until the next time you use it.
Once you have a good, thick seasoned coating developed, you can safely use a bit of soap when washing, but it really shouldn't be needed.
In the midwest and other humid locations, dutch ovens have a higher risk of rusting and require more care than in drier locations such as the Rocky Mountain states. Maintaining a solid seasoned coating and that thin film of oil will keep your cookware rust-free and ready to use. If (heaven forbid) you do develop rust, please read about how to restore your dutch oven.
At some point, you will probably run into a situation where you have a disaster to clean up. Maybe you went fishing and left the dutch oven cooking for 5 hours instead of 2 or maybe the lid was not on firmly and too much moisture escaped. Whatever the excuse, you now have a lot of hard, cooked-on crust.
At this point, you can either cross your fingers, scrape it all out and try to clean as described above or you can tell yourself it's about time to reseason this old pot anyway and start over.
Comments:
There are a few different ways to remove the old coating, but I heated it as hot as my oven would go (around 550) for over a half hour and then scoured everything off with steel wool after it cooled. Then, after four cycles of coat with oil, heat to 425, and cool, it looks good to go.
Find more Dutch Oven Resources at DutchOvenDude.com


Recent Comments